This is the promised compensation after the five song EP Wild Oak.
Oh God
Bring Me
Coffee
About Coffee.
Except from being a very nice beverage, this the thoughts behind the songs…
Oh God, a little 90’s flirt with a synth that is tight in its harmonies, and also the repeating and chopped parts in the intro. Believing in some kind of God, this is in no way a musical representation of that, just, laidback and relaxed play with notes, sounds and rhythms… rather being happy, as I believe a God, any God in fact, would like us to be…
Bring me, a little aggressive at first, like someone who is desperately in need of their first cup of coffee in the morning perhaps would be… but then slowly softening up as the coffee works its magic. Still the hard and focused hunt for coffee continues through out the day.
Coffee, a soft and happy and relaxed tune, complex in its appearance, as a cup of coffee can be in its taste. Sometimes perhaps not as we expect, yet still meeting our expectations.
Popcorn – you know when you make popcorns on the stove? First almost no sounds, nothing, then you can hear the oil heating up, then, oh, one pop. Then another, and suddenly some more, then more, and more, and more, and just crazy popping all over the place, then again, slowing down, to almost nothing, and then, nothing… and if you do not remove the pot from the stove, you’ll start to smell the burned popcorn.
Unify – bass for the win! And oh, the distant piano. All the digital, static sounds are mixed with the organics of the voices. Even if they too are computer generated, I wanted to get that organic feeling and create the tension between the two worlds. To unite them into one unity.
Reunion – I often think that I would like to reunite with the music I grew up with, in the 80’s and 90’s, but at the same time, I do not want to relive it, so I figured I would walk down the memory lane soundwize for a short reunion. Another reunion in this song is the secondary melody. When part of the first melody, it feels sad. But repeated on its own, with different supporting elements, it gets happier. Then again, reunited with the first melody and the same effect is one more achieved.
Endless Circle – a circle has no end, according to a character in a famous book, that recently made it to a TV-series. A great one I might add. Again, a little inspired from the previous song, I choose some sounds from the past. And I made a static bass, representing the curved line leading back to itself. 88 BPM to represent infinity. Wanted to go for 80, but it got too slow.
Labelless – well, when I thought about what to call this song, I first tried to place it in a genre, but failed miserably. Just figured that it was Labelless. Like me, so that is what I called it.
Opposite – If there is a here, then there automatically will be a there, if you direct your attention to anywhere else but here. And this is what I think about the sounds and components of this song. There are sounds and melodies that I can focus on, they will be precent here, but that leaves all the other sounds and melodies not here, but still part of it all, and in a way, they are opposite the sound in focus.
Origin – everything, and everyone has an origin, a beginning. This song is certainly not my beginning, or my origin, but it was born out of a writers session where I thought much of how everything came to be. How it all was created. With a lot of energy, but I believe in a slow pace. And a lot of patience. And that is what this song is about.
Pandora – you know, the one opening the box? First curiosity, then getting closer to the box, fighting the urge to opening it, heart pounding in the chest trying to resist the temptation, then moving closer and closer and finally opening it up, letting it all out… the misery and pain of this world. Here represented by a slow synthmelody, slowly slipping out into the world. Then, nothing, all done, too late. This was it, I’m done! But what was let out will still find its way around the globe, and perhaps even further out in the universe, who knows?
First of all, don’t ask me why it has five songs. As always for an EP I was aiming for a 4 song EP. But don’t worry, I promise I will make it up to you by releasing a three song EP someday.
First song, After Darkness, was just that. A happy place in my life after some darker days. Now, we all have darker days every now and then, so I figured I’d just make a song to celebrate that those days too will pass…
Wild oak, title song of this EP. I am very fond of the “Michael Jackson-ish” baseline that runs to parts of this song, giving it a playful energy when combined with the more static and square parts of the song.
High on life, yeah, what better thing to be high on? Nothing that I can think of! A celebration to happiness and awesomeness! And of course, life itself! Yay life! <3
New-born was a song that I wrote for the next EP, but somehow, I figured it belonged here, so this is the “failing” track that should not have been on this EP from the start. The best part of this song, according to me, is the two different piano melodies that you meet alone at first, and then they come together, creating interesting things as a combo.
Fading was another one-night creation. Going for a melody that could be carried by an unorthodox sound, that would make me able to place it in the background of the other sounds, still making it strong and claiming its rightful place. I kind of enjoy how it starts far back, fades in, does its thing, then fades out.
Oh, and a cool thing about this EP! It is mentioned in the book “N3v3r!and”.
Except for the obvious (that this EP was created 4 U) the first track, Breath of an Angel, was intended as a bonus track for paying customers on the platform “Bandcamp”. But I abonned both the platform and the former artisname so this track ended up as the first track on this EP. 4 U!
The song 4 U is actually containing voice samples of my own voice. In this song I want to mix the sharp, exact and precise digital with the organic and unpredictable in nature (represented by my voice and the sweeping sound of the wind / ocean (which ever you prefer)). Even if I am not the greatest singer in the world, I found it hard to do the voices “dirty” and “off beat”… so I had to cheat a little within my DAW to reach my goal.
Something is a song that I made in one evening in my studio, just wanting to create something. And something was created. Something, here 4 U!
Oh, yah… John Marwin… sorry about this track, it scares the h*ll out of me… Have you seen the movie “Killer Klowns“? If not, please don’t, well, this movie was partially channeled in this song… Too bad for John though… hope you’ll get over it one day!
The Beginning is a few years old, and was originally released under a different artist. But it suited this concept perfectly well, so it felt natural on the first ever Muddhedd EP!
Fantasy was created with sounds blending in each other to deliberately create “artifacts” of sounds and tones that are not really present. At least they are created in my head, or should I say my hedd?
Open mind was created on my everyday local commute by train. With a little of the same theme as Fantasy, but with the pace and regularity as the train, and as the days of the week, with changes in pace every now and then, perhaps between stations, or on weekends?
The Last Voyage – first called The Last Voyage of the Glory, and was intended as the first track on a Soundtrack to the book “The Last White Witch”. But the soundtrack was never finished, thus the song was (partially) renamed and released on this EP.
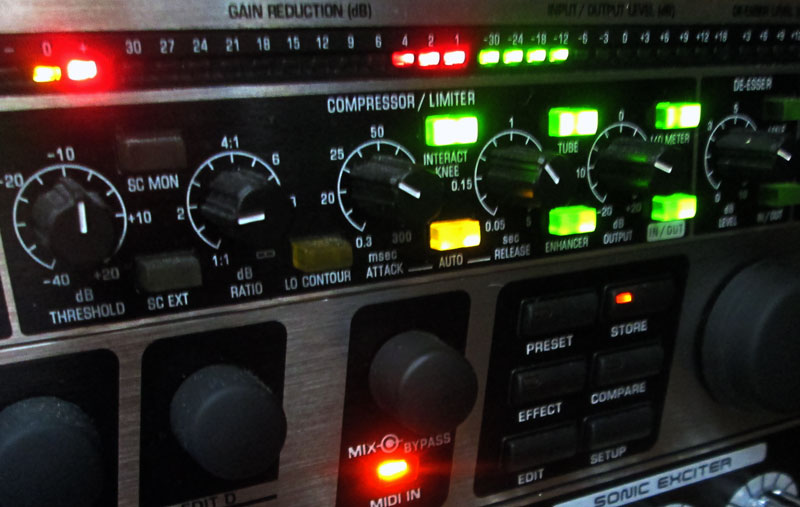
The compressor is a most usable and interresting thing. With this marvellous thing, you can affect the dynamic of the soundsignal.
This may sound a bit wierd at first, but once we take a deeper dive, it will hopefully make more sense.
Just a quick background. A soundsignal is measured in deciBels (dB). There are a lot of variations to different dB scales, and I will not go into depth with those for now, so let’s just generally agree on that dB is the scale that measures the energy of the soundsignal. The greater engergy, the louder is the sound and the larger the dB value will be. And the opposite, the smaller energy, the quieter the sound is, and the smaller the dB value will be. So loud = high dB. Quiet = low dB.
If you look at a recording of a human voice, either spoken or sung, you will see that the soundwave varies a lot from very high peaks to very small peaks.
When you listen to such a file, you will eventually see the correlation between louder parts and higher peaks, and quieter sections with lower peaks. Keep this in mind. There are two more steps to take to fully understand the compressor. The first is the Threashold and the second is the Ratio. (Then there is the attack and release, but let’s save those for later.)
The threashold is a value in dB where you want the compressor to start working. As soon as the soundsignal gets stronger (louder) than this value, the compressor kicks in with the force that you set on the Ratio knob.
To set it in perspective.
If your soundsignal is a song and you sing quietly in the verse, your song may stay below the threashold, preventing the compressor from doing anything with the soundsignal. And then you come to the refrain where you start to sing a little stronger, and the soundsignal passes over the threashold value, and as soon as you do, the compressor starts to work.
As I wrote before, the work the compressor does is set by the Ratio. For example the ratio can be 2:1, which means that counting from the threashold value, every 2 dB that the signal gets stronger will only result in 1 dB increase of the signal. 4:1 means that counting from the threashold value, every 4 dB that the signal gets stronger will only result in 1 dB increase of the signal. (Setting the ration to infinit:1 (infinit being the symbol 8 laying down) the signal will never get any stronger than the threashold value, and then you will have a limiter.)
The attack and release values (if available) determins how fast the compressor reacts when the signal crosses the threashold, and for how long after the signal has crossed the threashold the compressor should keep working. The benefit of those functions is to get a smoother compression or a harder compression, depending on how you set the values. With a fast attack and a fast release, you can get a pumping sound (which can be good for i.e. drums or bass), while a slow attack and slow release will get a smoother compression. But that is not entierly true. All depends on the soundsource, so you need to experiment to gain knowledge on how to best make use of the compressor.
Well, that is in short terms what the compressor does, but nothing about what you can use it to, or why it is good to use it.
The recorded signal is most often very dynamic, meaning it has it’s loud (strong) parts and it’s more scilent (quiet) parts. If you want to make the signal stronger (louder) you will boost the entire signal, and the limit of how much you can boost it is the strongest peak of the signal. Sometimes you want to boost the signal more. So the compressor will “push down” the strongest peaks, giving you more room to boost your signal, since the strongest peaks now have a lower dB value than before the compressor was applied. The downside is that you have less dynamic in your sound signal. And also, when you boost your sound signal, you also boost the background noise, both the background where your recorded, and the noise that all electronic equipment emits.
There is a Golden rule that I learned from a man much wiser than me: Use the compressor a little when recording, and than a little when you are mixing. This to prevent the sound signal from being overcompressed in one go.
This I have developed to a thing of my own. When I record, I run the microphone through a Mic Preamp with compression included. (The one I use is a dBx 286a, as to where the more modern version would be the dBx 286s.) The Mic Preamp is connected to a mixer, and then I run one of the Aux sends through another compressor that I compress even harder. And then I blend in the output signal from the secondary compressor with the signal from the mic preamp. This way I boost the lower parts with the highly compressed signal, and keep the dynamic (with only a little compressionrate on the mic preamp) from the original signal.
This can also be done within your recording/mixing software. The way you do that is that you clone the track that you want to apply this technique to, make sure not to move the soundfile sideways. Should you do this, the effect will be totally different (and can be awesome in a different way). The “original” track, apply a little compression to this, and then apply a heavier compression to the clone track. Then adjust the volumes to find a balance between the two. Typically the original track is stronger (volume wise) than the cloned track. But as I said earlier, every sound signal is uniqe so you need to find the balance between the two tracks.